Sunday, 11 October 2015

Knitting and Stitching Show 2015 - Alexandra Palace Part 2

My second day of helping Wendy on her MIY Collection was a busy one...


...but I still managed to get a little exploring and shopping done! 

My first stop was at Sew La Di Da Vintage where Caroline introduced me to Lou Lou! 


Isn't she gorgeous?! She would have been right at home at my sister's Gatsby party a few weeks ago. I love her fox stole and her face. Dolls faces can be tricky to master and stitch, but as Lou Lou's are printed she looks like a stress free sew!

I have long admired Caroline's vintage style patterns that have been resized for modern girls and sizes from afar (on Instagram!) so I had to grab myself a copy of this one! 


Top of my fabric list when I go into work this week will be fabric for Margo! 

I whizzed past the Pfaff stand on route to B33 and got really excited about yellow sewing machines...


...until I realised they were dummy models to showcase the sewing tables. But seriously how awesome are yellow sewing machines?! If someone makes one, I need one!

I made it to Wendy and met Grace from Beyond Measure who kindly took our photo. I love their dog pin cushions, go take a look! 


My husband who likes a pun suggested we have t shirts with the above on. I ran out of time pre show so we had badges instead! 

The fun and games didn't end there! Whilst Wendy was off teaching a class on Sewing with Knits, these two were up to mischief! 


Honestly I don't know where they get their cheek from! 😜

The rest of the afternoon whizzed by with chatting to customers and a little more shopping...


That 7000m cone of thread should keep me going a while. The gold crepe is ready for a 70's disco outfit for a forthcoming party and I finally have a Chaco pen to add to my chalk collection. 

I left Wendy all set for her last day...


... Said goodbye to Ally Pally and this incredible view


And headed home. Until next year Knitting and Stitching! 


Saturday, 10 October 2015

Knitting and Stitching Show 2015 - Alexandra Palace Part 1

Yesterday was sewtacular! I spent the day helping out Wendy Ward on her MIY Collection stand. (b33 in the great hall for those still to visit!) and then in the evening I took a drive down memory lane through Islington, where I lived from 98-04, to Sew Over It for The Foldline launch party.

This is what my day looked like!


I'm heading back there today for more fun. I wonder what I will see today?! 

Tuesday, 6 October 2015

Guest Post: Vicki Halliday Gets Shirty for The Refashioners 2015 #getshirty #therefashioners2015

I am very excited today, this is the first guest post on Dressmakers Social! 

You may remember Portia Laurie's Refashioners #getshirty challenge from the summer and my own post on my 4 shirts, 1 dress here

Vicki Halliday aka as @vicki_mostly_sews (on Instagram) wrote an awesome blog post about her #therefashioners2015 garment and as she doesn't have a blog of her own (she totally should!) she is guest posting here. 

Over to you Vicki!


I got all inspired by Portia’s Refashioners project & dug out this shirt from my jumble-sourced stash of items that patiently await their time to shine. 


I had just made an Alder shirtdress & was struck by the idea of chopping the length off to make a short version.


I liked the classic stripe & crisp hand of this cotton men’s shirt. After chopping off the collar & cuffs, I found the seams were all sewn with (what I call) daisy chain - it’s machine made from one thread, so once you find which direction it’s been sewn in, you can pull the entire thread out. So it was fun & pretty quick to pull apart. 


I needed to make a couple of decisions & adjustments to fit the pattern onto the fabric of the shirt. I traced off new skirt pieces to preserve the original pattern. I wanted to make a new collar but keep the button stands - I cut the fronts carefully to make sure I was happy with where the top & bustline buttons would be. 


I taped the yoke & back pieces of the pattern together to keep the shirt’s original yoke. I pieced the upper collar but the stripes were easy to hide the seam in. I cut the pockets on the bias & turned the top hem to the outside to take advantage of the fun chevron effect. I had to trim the skirt pattern a little shorter & piece bits of the sleeves together to get everything to fit the remaining fabric. And of course I saved the care label that was sewn to the button stand.


I really enjoy sewing the Alders, and this fabric was crisp & lovely to cut, sew & press. I overlocked all my seam allowances for neatness. I didn’t have enough fabric left for binding so trawled my scraps & picked out the tiny rose print. It’s a semi-sheer lawn, I inherited it from somewhere long ago & have never been sure what to do with it. The navy & gold buttons are from my stash but I remember buying them at a car boot sale this summer. 


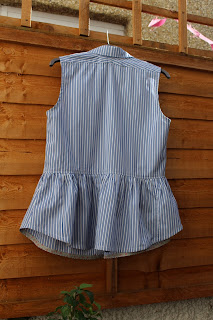
I have got dodgy phone pics of me wearing the shirt, but I don’t like them. I was feeling bloated on the day I took them & the crisp fabric stands away from my body & I’m not sure how I feel about it. Which is a good thing. I mean, I think this shirt would look great on an associate lawyer in Suits, and I’m really proud of my sewing & I even think it looks great on the hanger. I thought maybe I’d picked the wrong fabric for this shirt, but now I think I’m just not into the crispness on my body. So it’s good because that could change. I might have a day when I want to dress for office-battle, you know? 


I guess I love what this make represents more than the finished article. It’s been created in a context of many other people feeling inspired & flexing their skills, it’s a part of something. For helping me to be a part of The Refashioners 2015, I love it. 

--

It is a fantastic refashion Vicki! I love the stripe matching on the yoke, the care label, bound edges and your perfect stitching! I also like your honesty, we don't have to love everything we make, sometimes the process and lessons learnt are more valuable than another item in our wardrobes, sometimes! Thank you for guest posting you are welcome back anytime!

--

I would love it if this blog had other "voices", if you would like to guest post get in touch!


Monday, 28 September 2015

Dressmaker Social - Notions and Potions


The theme for our next meet up is Notions and Potions. 

Bring along any unwanted notions (zips, ribbon, buttons etc) that you will honestly never use and either leave them and walk away for swap them for something that you will use!

The Ask It Basket is back and the theme is Costumes! With Halloween just around the corner (33 days to be precise - it's Jacob's birthday so we are counting down!) if you have a costume dilemma bring it along to the Ask It Basket! 

See you at the new time of 6.30-8.30pm at The Marwood Coffee Shop on Monday19th October! 

P.s. These Halloween nets are on sale at Ditto Fabrics now! 

Wednesday, 23 September 2015

Dressmakers Social - Sewing Menswear with Richard Clark-Monks


Confession time! I wasn't sure what to expect of Ricky's talk about sewing menswear patterns. I have only met him a handful of times since I started Dressmakers Social back in April and I have not attended a sewing class with him. But I had a little feeling that something good would come of our meeting. So, I asked him if he would like to do a talk on sewing menswear patterns, putting a lot of faith in... well he is a sewing teacher, he is a man that sews and he is lovely so what's the worst that could happen?!

Turns out gut instincts work and I was blown away by his well prepared and informative talk. I live tweeted during the evening as @dressmakersbton on twitter with snippets from his talk but they just didn't do the evening justice. Luckily for us Ricky has posted his notes on his blog here! But be prepared for your mind to start buzzing with ideas and inspiration.

A few things I took away were:

  • Don't judge a pattern by it's cover
  • Make adaptations to the patterns to achieve a good fit and then keep that as your block
  • Use that block to make detail adaptations to, different cuffs and collars etc...
This is what the evening looked like....

Making a point!
Lionel Bear in a supporting role
Checking out finishes on shop bought garments

Taking measurements
Sample garment which includes different pockets, belt loops and fly. A great way to test different techniques is putting them into a garment.
This jacket was a hoody pattern and adapted to a jacket. Lots of interesting details and a fabulous lining!
I'm inspired to find some time to try some more menswear patterns for my husband, once I clear some of my sewing to do list that is!

Next meet up is on Monday 19th October, 6.30-8.30pm at The Marwood Coffee Shop, Brighton. Details to follow! See you then! Emma 


Wednesday, 9 September 2015

September's Meetup - Sewing Menswear

Do you sew your own clothes? Live in Brighton or nearby? Want to meet other like minded people to talk about dressmaking? Come along to the Dressmakers Social meet up! 

The next meet up is on Monday 21st September from 6.30-8.30pm at The Marwood Coffee Shop.

Our theme this month is Sewing Menswear. Do you sew for a male in your life? Are you male and sew your own clothes? Come along and here our guest Richard Clark-Monks, designer and sewing teacher, talk about patterns and techniques!


Ricky, would like to know which menswear patterns you sew. bring them along with you on the night so we can take a look!

Looking forward to seeing you there!

Emma 

Tuesday, 8 September 2015

The Refashioners 2015 - 4 shirts 1 dress!


I was excited enough when I saw the line up for this year's The Refashioners Challenge organised by Portia from Makery.uk but when I spotted here that it had opened up to ordinary sewers to take part too I got extra excited and started mentally planning how I would refashion a shirt.

I have refashioned shirts twice before for the mini me but never for me. 

My favourite item of clothing to wear is a dress, so for me that was the obvious choice of garment to turn a shirt into. I had in mind the pattern I drafted last year for my Parasol dress with some thing different at the front.

I also wanted to be able to wear it in the autumn as I knew I wasn't going to have a chance to sew it during the school holidays. I had in mind a heavy cotton drill shirt, like the Dickies one Chris has in his wardrobe that is too new and worn too often to be refashioned. I browsed a couple of charity shops and on eBay but couldn't find anything suitable, my light bulb moment was army surplus shirts. I wasn't sure if I can wear that much green but I can wear that much blue.

One shirt wouldn't make a dress so I bought four Royal Navy shirts from an online Army Surplus store with the request of them being as large as possible. 

This is what arrived, four shirts varying slightly in colour, complete with their name tapes and their uniform badges. I loved the shoulder straps and pockets and buttons that are a little larger than normal shirt buttons. One shirt had the previous wearer's name stencilled into the inside back of the shirt. I like the badges too but decided not to use them for the dress.


This is the dress...
 ...and me feeling a bit awkward posing for my photo! 
Thank you Wendy Ward for taking them!


This is how I made it...

 I decided that I wanted to keep as many of the shirts features e.g. pockets, shoulder straps and plackets into the dress as I could. 

I dismantled the shirts to give me as much fabric as possible. I then joined pieces together to make larger pieces of fabric so that I could cut out my pattern pieces. Where I thought a pocket would work I left it on the fabric and removed those that got in the way. I removed them from the shoulders on the front of the bodice as they would have been too bulky and this left two darker patches of fabric that I placed symmetrically at the shoulder. 


I used one of the button stands as the centre front of the bodice and added pin tucks either side.
This was a variation I had wanted to try for this pattern and I really like it. I am planning on using it on a future dress too. 


I placed pockets on the skirt in line with the waist darts and used button stands as part of the skirt. 


A name tape made it onto the back of the dress.


With some sleeves and their cuffs at the hem


I used a fell seam to join the centre back pieces.


I reattached the shoulder straps to the sleeves.


An invisible zip, bias binding at the neck and sleeves finished it off. 


I now have a super comfortable, fun, completely unique dress that I love. 

Thanks for organising Portia, I'm looking forward to next year already. And thank you Wendy for teaching me the pattern cutting skills two years ago that enabled me to make this :)